Sunday, December 26, 2010

Seafood bisque

Seafood bisque
Today I had some leftover lobster and unpeeled shrimp staring me in the face. "Please do something with us, we don't want to spoil". My immediate reaction was seafood bisque, pink as in red from tomatoes and white from cream, with a distinct seafood flavor. What else defines a seafood bisque?
Stock of course. Well, crustaceans comes with exoskeletons , and that holds a most flavor. So cook the shells with thyme, parsley and pepper corns for about 30 minutes and you have the best seafood stock ever.
Aromatics are an important part of the soup. You  start with a mirapoux (2 parts onions, 1 part celery ribs, and 1 part carrots all diced the same size).
Sweat this in butter with some salt until translucent.
Add flour and cook on low flame for a couple of minutes.
Add the seafood stock and stir until the soup is smooth.
Add a can of tomatoes (or peeled and de-seeded tomatoes) and cook for half an hour.
Blend with a stick blender until you have a smooth soup.
Add cream and the peeled seafood and cook until the seafood is just cooked.
Eat with slices of crusted bread.

Monday, December 13, 2010

Salad Dressing Basics

Since you all know by now, I do not believe in buying ready-to-eat food. Food comes from a farm or a garden, not a factory with workers in white coats, goggles, gloves and plastic hair caps. So a salad dressing in a bottle is a complete no-no in my kitchen.

Salad dressing is just variations to the same tried and true theme. Repeat after me: 1-2-4 as in 1 part flavoring,  2 parts acidity and 4 parts oil. Also the technique is the same: first mix the flavoring and acidity together, then introduce the oil slowly while whisking firmly to start an emulsion.
The end result should be slightly tart, full of flavor and thick enough to stick to the salad.

Also, important is to taste the dressing before you introduce the oil ensuring the balance between salt/acid/sweet is to your liking. Emulsion is a delicate balance between oil and acidity with eggs or mustard as the emulsion starter. Adding these elements after the emulsion is complete could break the emulsion, forcing you to start over again. Trust me, it has happened to me before.  

Some final notes on salads before I share some dressings.
  1.  I always use my hands for tossing salads; I have more control over my actions that  way.
  2. Adding the dressing right before plating the salad is the best, otherwise the lettuce gets soggy.
  3. If you like you lettuce with a real crunch, set the lettuce leaves in ice water. Just make sure you dry the lettuce before you add the dressing as you spend all this time creating an emulsion it would be a waste to have it get runny again.
Honey- mustard dressing
  •  ½  teaspoon honey
  •  ½ teaspoon Dijon mustard
  •    2 teaspoons lemon juice
  •   Salt and pepper to taste
  •   4 teaspoons good olive oil
Toss with spring mix.

Walnut salad
  •  ½ teaspoon honey
  •  ½ teaspoon parsley
  •  2 teaspoons red wine vinegar
  •  Salt and pepper to taste
  •  2 teaspoons walnut oil
  •  2 teaspoons olive oil
For the salad ingredients you need spring mix, rendered bacon and walnuts.
Blanch raw walnuts for 1 minute and shock in ice water to stop the boiling process. Chop the walnuts in small pieces and roast in a 300 degree oven for 10-15 minutes. When you smell this wonderful nut aroma, they are done. Cool the nuts.
For the bacon, I mostly use the broiler section of my oven. The bacon goes on a rack with a dripping pan underneath, so the dripping are preserved for later use. (Bacon fat still rules). After the bacon is rendered well and cooled off, I tear the rashers into bite size chunks.
Toss the spring mix, rendered bacon and walnuts with the dressing and plate.

Sunday, December 12, 2010

Pomodore sauce

Scott Conant, the chef from a chain of Italian restaurants in New York and Miami Beach, showed this simple way of making the ultimate pomodore pasta sauce. I tried it, and now we do not go back to any canned or jarred pasta sauce anymore. The measurements are not exact, but experiment as you like to get the right amount for everything.
You start of with Roma tomatoes. Make an incision in the top and cook them in boiling water for 1 minute. This loosens up the skin, which we want to discard. Shock the tomatoes in an ice bath and now you can peel the tomatoes very easily. Cut the tomatoes in half and discard the seeds as well.
Cook the tomatoes over low flame in a little olive oil with some red pepper flakes and salt for about 45 minutes until they are soft and cooked through. Use a masher or the back of a ladle to smash the tomatoes fine. You want to get a nice pulpy mess.
In the meantime, in a saucier, warm up about a cup of olive oil, and add about 6 garlic cloves and a big handful of basil leaves. On a low flame, keep the oil warm. This will extract the flavor from the basil and garlic, infusing the oil.
Add the oil to the cooked tomatoes and throw in a couple of additional basil leaves for good measure.
This is your pomodore sauce. If you like the sauce very smooth, throw the whole mixture in a blender and blend until fine. If you like it chunky, never mind the blending.
Cook your favorite pasta until al-dente. Finish cooking the pasta in the pomodore sauce and add a little butter to emulsify.
Sprinkle with your cheese of choice, and enjoy

Coq au vin Chef Pappa style

My Coq au vin is different from the classic one you see in many cookbooks. Most important difference is that I do not use red wine in the recipe but white wine. In my opinion, the white wine pairs better with the chicken. Red wine in such a slow pot dominates the total taste. However, with strong tasting recipes as Boeuf Bourgionne or Goulash, red wine is the best liquid to use.
I also do not use the full chicken but only the chicken thighs. Slow pots with whole chicken always suffer from overcooked and dry breast meat, while the rest of the chicken is perfectly cooked. Same with slow pots with only breast: dry pieces of meat. The thighs, because of the higher fat content, stays juicy and moist, even after long cooking.
What do you need for Cocq au vine Chef Pappa Style?

  • 1 pound of chicken thighs, cut in cubes.
  • 1 cube of chicken stock powder (you could use chicken stock of chicken broth, but that throws off the amount off liquid you have left; so when you use a liquid, reduce the sauce lightly. You reduce by taking the lid of the pot for the last 30 minutes of cooking)
  • onion, finely chopped
  • 4 cloves of garlic, smashed and chopped finely
  • lardons (strips of good bacon)
  • mushrooms, slices in small strips.
  • white wine (the cooking variety. You won't taste the difference anyway)

Firstly, season the chicken cubes with salt and pepper and brown the pieces in a skillet with a little butter. (Yes butter, it will add another dimension to the taste). Meanwhile, fry the onion, bacon, garlic, lardons and mushrooms in your favorite Dutch oven or other pot for slow cooking. When the chicken is golden brown, add to the Dutch oven. Deglace the chicken skillet with the wine whine (the white wine is the only liquid in the recipe, so make sure you add enough...) The deglacing is to ensure all the chicken pieces and drippings still in the skillet make it into the final concoction. Now is the last time you will be able to check the seasoning. If you need more salt and/or pepper, add it in now.
Add the chicken stock powder and simmer for at least 45 minutes. After 45 minutes the alcohol is completely cooked out and the resulting taste is rich and complex.
Now you are done with the cooking. However, with all the butter, chicken fat and bacon, it is quite fatty. Best is too cool the coq au vin in the fridge. The fat will form a layer on the top, which is very easy to skim off. After skimming, you have a wonderful tasty and very lean coq au vin.
If you think the coq au vin is too thin, you can thicken the sauce with a little corn starch or arrowroot powder.
We always eat this with white rice and a simple salad.
Bon Appetit!
Note: you can vary the ingredients a lot. Most of the time start the vegetables with a mirapoix (1 part chopped celery, 2 parts chopped onion and 1 part chopped carrot ), and I add red bell pepper to the veggies. Another suggestions is white pearl onions, and wild mushrooms like cremini or shitaki. The possibilities are endless.

Boeuf Bourguignon

One of the most prepared French classic beef stews. You will see variations stripped to the core and very elaborate versions. Some are very saucy and some are reduced to almost dry state. As long as you keep the core recipe in tact, the variations are endless.
The principles of a good Boeuf Bourgionne:
  • The cooking liquid consist of only red wine. Purists will only use a wine from the Burgundy region in France, but actually any sturdy red wine will do. I use nothing but simple cooking wine.
  • The taste mostly comes from an herb mix the french call a "bouquet garni". It consists of a couple sprigs of thyme, a couple of bay leaves and parsley. They are tied together in a nice bundle, so they can be easily discarded after cooking.
  • Carrots are an essential ingredient. The carrots add a dimension of sweetness to the stew
  • Do not forget the bacon in the stew. Most of the salt comes from the cured bacon.
  • Cook low and slow. A good stew takes time on low flame. Simmer until fork tender is the rule
  • If you do it right, you do not need any additional binding agent. After browning the meat and vegetables and before you add the liquid, just dust them with flour. After simmering and natural reduction, the sauce will be nice and thick. However, when the sauce is too loose, just add a little corn starch slurry, and it will thicken to your liking.
What does the basic version need?
  • Beef chuck, in nice chunks. Not too small, you want to see beef in the final result
  • Chopped onion, celery and carrots. (Classic mirepoix)
  • Flour
  • Boquet garni
  • Red wine, about 3/4 of a bottle
  • Lardons (cured bacon cut in nice chunks)
  • Mushrooms
  • (Optional) pearl onions, tomato paste
Cooking methods:
  • Season the chuck with salt and pepper
  • Brown the chuck with butter in a skillet for a couple of minutes until nicely colored. Transfer to a Dutch oven or casserole
  • Brown the vegetables in the same skillet and add to the casserole
  • Mix in some flour until the vegetables and meat have a nice dusting
  • De-glaze the skillet with the red wine. Make sure all the brown bits are resolved
  • Add glaze to the casserole and bring to a boil
  • Add bouquet garni and reduce heat to a low simmer
  • Render the bacon and add to the casserole
  • Simmer for at least 3 hours until the meat is fork tender.
  • A half hour before you are done, brown the mushrooms and other ingredients you want to add to the stew. Especially mushrooms should not be overcooked. They will take on the flavor of the stew very quickly and when cooked too long, they become mushy
  • Serve with either rice, potatoes or bread.

Eclairs


Jacques Pepin described in his book on french cooking methods how to make cream puffs. I used his recipe without alterations, because it simple rocks:


Step 1: Make cream puffs

Ingredients:

  • 1 cup of water

  • 1/2 stick of unsalted butter

  • pinch of salt

  • 1 cup flour

  • 4 eggs

How to make this:

  • Boil water with salt and the butter until the butter has melted and the mixture boils

  • Remove from the heat and add flour

  • Stir until flour is incorporated


  • Back on low heat for a couple of minutes until the batter is dried out (Not sticky on your fingers anymore)

  • Place dough in a bowl and let it cool for 5 minutes

  • Add eggs one by one and incorporate. (I use a standing mixer for this, but you should be able to do this with a spatula)

  • After all the eggs are incorporated you should have a smooth and sticky paste

  • Pipe the dough in balls as big as golf balls on a baking sheet lined with parchment paper

  • Brush an egg wash over the puffs (egg wash is an egg beaten with a little bit of water)

  • Let the put rest for 20 minutes. This will dry out the dough even more, and ensures proper cooking

  • Bake for 35 minutes in a 375 degree oven

  • Cool cream puffs in the oven.

The result should be dry and golden brown puffed balls.

Step 2: the vanilla cream or English Cream:

Ingredients:

  • 2 cups of milk

  • 6 egg yolks

  • 2/3 cup of sugar

  • 1 teaspoon vanilla

  • 1/2 cup flour

How to make this:

  • Boil milk

  • Meanwhile, beat the egg yolks and sugar and vanilla with a whisk until the mixture resembles a white ribbon. (again using an electric mixer will speed up the process a lot)

  • Add the flour to the egg mixture and incorporate well until you have no more clumps.

  • Add a little bit of the hot milk to the eggs, slowly heating up the eggs. This process is called tempering the eggs

  • Cook milk and eggs until you have a smooth and creamy paste

  • Cool until lukewarm

The final step is to open the puffs and fill them with the cream.

They are incredible. Resist the temptation to eat them directly by yourself

Lemon Thyme Roasted Chicken


What do you need
- 1 chicken
- salt, kosher is the best
- pepper, freshly ground
- 1 or 2 lemons sliced
- juice of 1/2 lemon
- at least 5 sprigs of thyme
I have tried many times to create the perfect roasted chicken. Skin on vs skin off, whole chicken vs cut up chicken, brining vs marinating, whole chicken vs de-boned chicken: you name it; I've tried it. Nothing really that good, until I discovered the tried and true method of seasoning under the skin. That's when roasted chicken took off. Thank you, Jacques Pepin, you rock!
Under the skin seasoning is good for a couple of things. The skin becomes crispy and nicely browned, and the seasoning penetrates the meat all the way to the bones. There is a lof of fat under the skin, which helps to keep the meat juicy and moist, so you don't need any oil or butter anymore. Also the bones give a lot of flavor to the meat, so bone-in is definitely the way to go.
The technique for "under the skin seasoning" not difficult, but as always there is some work involved in it. You have to be gentile otherwise the skin breaks. If your chicken was deep frozen, make sure the chicken is completely thawed before you start. The skin brakes easily when the chicken is not completely thawed.
Start at the breast side of the chicken at the opening to the cavity. Stick your figures under the skin and gentily loosen up the skin al the way to the neck. Then work your way to the thighs and drum sticks, loosening that skin as well. When the breast side is completely done, turn the chicken over and loosen up the back side.
I found that using your fingers gives you the most control and prevent breakage vs using a chop stick or another device. Just make sure you wash your hands very well afterwards to prevent contaminating other foods.
Once the skin is completely loosened up, the seasoning starts.
First up: salt! Set salt aside in a bowl or plate and disregard the remaining salt when you are done. Again to prevent contamination. Use your fingers to pat the entire chicken under the skin with salt and rub the salt in a little bit. This will accelerate the absorption of the salt. Salting the chicken is important as the salt creates pores and tunnels into the meat so that the rest of the aromatics can penetrate the meat all the way to the bones. Also, put salt in the cavity of the chicken, so the salt can work it's magic on both ends.
Next up: pepper! Again pat the bird with pepper and rub in and put a fair amount in the cavity.
Finally the rest of the seasoning. Squeeze half a lemon and message the chicken with the lemon juice. Cut the lemon into slices and stick the slices under the skin: 3 slices under the breast and 1 each under the drum sticks. Stick a fair amount of thyme everywhere under the skin and in the cavity.

Now the waiting starts. Cover the chicken with plastic wrap and stick it in the fridge. Let marinate at least 6 hours, overnight is even better.
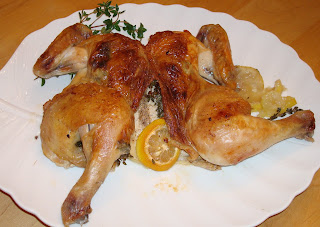
When you are ready to roast, cut out the backbone of the chicken with a sharp knife and crack the breast bone, leaving you with a "butterflied" bird. The butterflying ensures the most cooking surfaces and makes the entire bird equal in height. Equal height means equal cooking time and no undercooked dark meat while the white meat is overcooked and dry.
Preheat your oven to 450 degrees and when the oven is hot, lay the chicken on a baking sheet or roasting pan and douse the chicken with a little bit of white wine, vintage of your choice. Bear in mind, that you only need the wine flavor, so cheap cooking wine will do just fine... In the oven with the bird.
After 30 minutes or so, the skin will be nicely golden brown and delicious. Reduce the heat to 350 degrees and cook until done. For a 3 pound chicken the total cook time is appr. 50 minutes, a 5 pound chicken 60 - 70 minutes.
I have a couple of oven thermometers and they work very well. Stick the probe into the thickest part of the thigh and cook until the internal temperature reaches 150 degrees. Do not cook the bird all the way to the recommended temperature of 160 degrees! When you take the bird out of the oven, the carry-over-cooking will cook the meat at least 5 degrees more. You want a juicy chicken not a piece of rubber!!
Actually lately I employ the "chopstick method" for done-ness checking: Stick a chopstick into the thickest part of the thigh. When the juices run clear, the chicken is done. If you see pink or red fluids, roast longer.

Brussels Sprouts

I do not like Brussels sprouts. I do not like them, Sam I am! I used to think there would be no way I could eat them. Childhood memories of sprouts boiled in salted water and eaten like that. It still gives me the chills.

However, these little green monsters are very good for you, healthy food and even help you to reduce your waistline. So there must be a way to make them eatable. Well, enter the bacon!!! Everything tastes good with bacon, so why not Brussels sprouts?

Firstly, I need to get over the shape and size of the veggie. So shaving them into small strips first. Use a mandolin for this, or slice them very finely into small strips. Be sure to first take off the outer leaves, they are hard and not so appetizing. Also cut off the stem part of the sprout.


Next up, the bacon. The more smokey flavor, the better. Anything to hide the taste of the sprouts. Again, presentation is paramount, so cut the bacon in strips the same size as the veggie slices.

No we can start cooking them. Heat up a skillet and add a drop of oil, just to get things started. Add the bacon to the pan and sautée for a minute. Now we start adding more flavor to the party. Why not minced garlic? So far, so good. Add the sliced sprouts and sautée for until the veggies are cooked through.

I like glaced vegetables, classic French technique to make vegetables look shiny and professional. So add just a touch of butter to the sautepan and coat the vegetables with the glace.

Even I will now eat this... Maybe the kids will too.

Artichoke hearts and roasted pepper salad

Ingredients
-Canned artichoke hearts, drained and cut in halves
-Red bell peppers
-capers

For the vinaigrette you need
- Dijon Mustard
- Basil (chopped finely)
-Lemon juice
-Salt and pepper
-Olive oil
-Shallots or red onion (finely chopped)


How to make this:

  1. Arrange the artichoke hearts on a baking sheet and broil in a oven until nicely roasted. Flip over once.
  2. Roast the bell pepper in the oven until the skin is blackened. Place the peppers in a bowl, cover with plastic wrap and let is sit until the peppers are cooled off, peel and chop in the same size as your artichokes.
  3. For the dressing: add the shallots, basil, mustard, lemon juice and seasoning in your food processor and pulse a couple times until everything is nicely combined. Add the olive oil bit by bit until you have a nice emulsified dressing.
  4. Pour the dressing over the (still warm) artichokes and bell peppers
  5. Add the capers and combine.

Guacamole

Ingredients:

2 ripe Haas avocados.
1 onion, very finely chopped.
2 jalapeño peppers, pith and seeds removed, very finely chopped.
1 clove of garlic, very finely chopped.
juice of 1 medium size lime.
1 tablespoon cilantro, finely chopped.
1 teaspoon salt (this dish needs a lot of salt)
freshly ground white pepper to taste

The salt in this dish is not only for taste. Salt works as an abrasive to mash the onions, garlic and peppers and turn it into pulp.

Throw all ingredients in a bowl and use a spoon to mash things up. It's alright if some little chunks still exist.

Another method is to use a mortar and pestle to mix things together. Do not use a blender or food processor; the guacamole will lose the little chunkiness you want.

My favorite application is as a crostini:

  1. Make the guacamole
  2. Toast slices of crusty bread (baguette or Italian bread) in the oven or your favorite toaster
  3. Slather the guacamole on the toast
  4. Top it off with smoked salmon
You'll be amazed how fast this becomes the star dish of your party...

Chef Pappa in a new location. Indonesian food part I


Chef pappa is now in this new location. I have been very inactive in the last months. That does not mean I have stopped cooking or experimenting with food. Au contraire, I've picked up Indonesian food again. The last time I did something with rijsttafels and such was in high school, but once I started cooking again the smell and taste was still the same.


Thanksgiving this year was a "small" rijsttafel consisting of only 10 dishes. I spend a good 4 hours creating all the dishes. Even the peanut sauce started out as shelled raw peanuts which I roasted in the oven first. Only the kroepoek (shrimp crackers) were store bought. Frying kroepoek yourself is not easy; temperature control is very important and it is basically too much work.


On the picture a sample of the Thanksgiving dinner dishes:
  • Atjar Tjampoer
  • Nasi Kuning
  • Gado Gado with Peanut sauce
  • Sambal Goreng Telor
  • Beef Rendeng
It was a lot of fun cooking this and even more fun eating it with friends and family. Can't wait to cook another meal for friends...